Secure Remote SSH For IoT Devices Behind Routers: A Guide
Are you tired of the limitations imposed by firewalls and NAT routers when it comes to accessing your Internet of Things (IoT) devices? Gaining secure and seamless remote access to your IoT devices, even those tucked behind the complexities of firewalls and NAT routers, is not just possible, but remarkably straightforward with the right tools and techniques.
The landscape of IoT is rapidly expanding, with devices becoming integral to our daily lives. From smart home appliances to industrial sensors, these devices are generating valuable data and enabling new levels of automation. However, the inherent challenges of securing and remotely managing these devices often overshadow their potential. One of the primary hurdles is the difficulty in accessing devices that are behind Network Address Translation (NAT) routers and firewalls. These protective layers, while crucial for network security, can make remote access a complex task, requiring specialized knowledge and configurations.
In this exploration, we delve into the intricacies of establishing secure remote access to IoT devices, specifically focusing on the powerful combination of Secure Shell (SSH) and innovative solutions like SocketXP. We'll dissect the essential steps, from configuring SSH on the IoT device to navigating the complexities of port forwarding and reverse tunneling, ensuring that you can remotely control and manage your devices, irrespective of their location or network configuration. The core objective is to provide a comprehensive guide that empowers you to overcome the common obstacles of remote IoT device management, allowing for seamless access and control from anywhere in the world.
| Aspect | Details |
|---|---|
| Core Technology | Secure Shell (SSH) |
| Purpose | Enabling secure remote access to IoT devices |
| Common Obstacles | NAT routers, firewalls, public IP address limitations |
| Primary Goal | Providing seamless remote control and management of devices, regardless of location or network configuration |
| Key Techniques | SSH configuration, port forwarding, reverse tunneling |
| Additional Solutions | SocketXP, VNC, RDP |
| Target Audience | Hobbyists, Developers, System Administrators |
| Reference | SocketXP - Official Website |
The initial step in securing remote access to an IoT device involves configuring SSH. This involves copying the public key to the IoT device, configuring SSH on the device, and editing the SSH configuration file to ensure the necessary settings are correctly implemented. The standard port for SSH is 22, and this port must be open and accessible. Moreover, setting up port forwarding is crucial for accessing downstream devices. In this example, we consider a scenario where a Raspberry Pi is connected to a router via ethernet and hosts a web page on port 80.
Since IoT devices are often shielded behind firewalls and private IP addresses, reaching them remotely can be a significant hurdle. The typical configuration of a home network involves a NAT router, preventing direct access from the internet. However, solutions exist to circumvent these limitations. Services like SocketXP offer an IoT remote access solution, facilitating a connection to the IoT terminal using SSH over the internet. The core mechanism involves forwarding port 22 (TCP) to the Linux machine's IP address within the router's configuration settings, typically located in the NAT or server settings.
The process of establishing remote SSH access typically involves several key steps. First, you need to configure SSH on the IoT device, which includes setting up the necessary security parameters and ensuring that the device is accessible on the network. The standard port for SSH is 22, and this port must be open and correctly configured on the device. You may need to edit the SSH configuration file to modify settings such as the port used for connections, authentication methods, and other security-related parameters.
Port forwarding is a critical element of this process. The router needs to be configured to forward traffic arriving on a specific port to the IoT device's local IP address and port. This ensures that incoming connections from the internet are routed to the correct device. This is typically configured in the router's settings, often within the NAT or server configuration sections. Refer to the router's documentation or portforward.com for tutorials on how to configure port forwarding on your specific router model.
Beyond the standard setup, there are advanced techniques to consider. Reverse SSH tunneling can be used when direct port forwarding is not possible. This method involves setting up an SSH connection from the IoT device to a server you control, which acts as a proxy. You can then connect to the server, and your traffic will be forwarded to the IoT device. This is particularly useful when the IoT device is behind a firewall that blocks incoming connections.
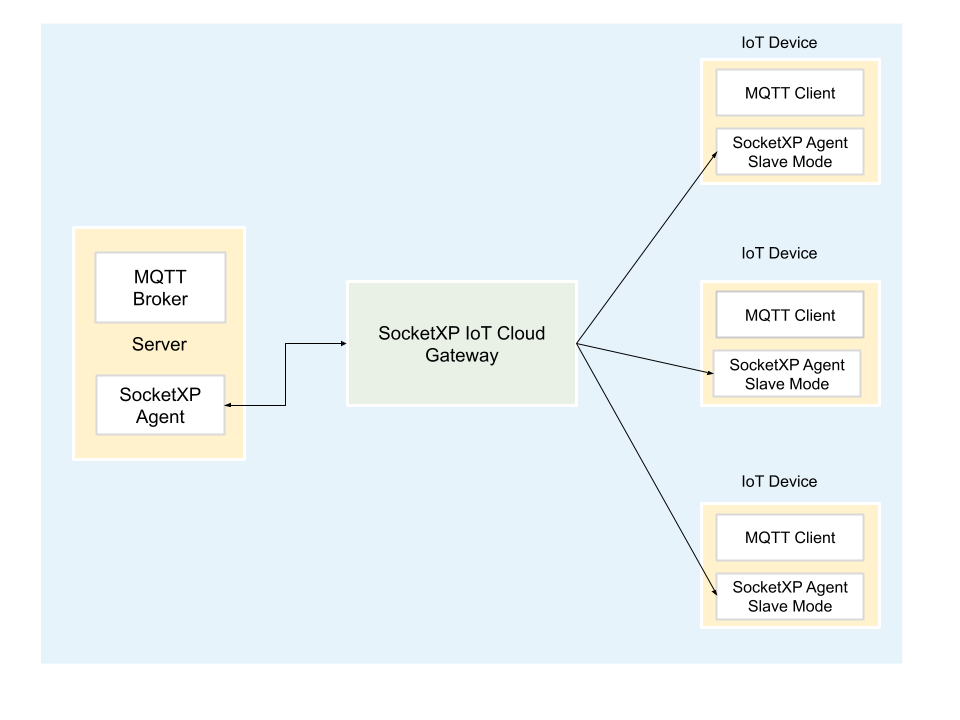
Several tools are available to simplify and enhance the remote access process. SocketXP, for instance, is a cloud-based solution that provides secure remote connections to IoT devices and edge servers. It eliminates the need to host your MQTT broker in a public cloud infrastructure, allowing secure connections even when devices are behind NAT routers and firewalls. Other methods include using Virtual Network Computing (VNC) or Remote Desktop Protocol (RDP) for graphical access, offering visual control over the IoT device's interface.
To illustrate the setup, consider a Raspberry Pi behind a router. To manage this device remotely, you would: 1. Configure SSH on the Raspberry Pi by installing the SSH server if it's not already installed. 2. Copy the public key to the Raspberry Pi. 3. Find the Raspberry Pi's IP address within your local network. 4. Configure port forwarding on your router to forward port 22 (or the port you've chosen) to the Raspberry Pi's local IP address.
Once these steps are complete, you can connect to your Raspberry Pi from anywhere on the internet using an SSH client. You'll use the router's public IP address, followed by a colon and the port number you've configured (e.g., 192.0.2.100:22). This simple setup grants secure remote access, allowing you to manage your IoT device without requiring complex network configurations.
Another scenario involves using a Linux server behind a router. In this case, if you cannot directly access the router's configuration or don't know its IP address, you can't set up port forwarding. Alternative solutions, such as SSH reverse proxy tunneling, become essential. The reverse proxy enables an SSH connection from the server to a remote server with a public IP address that you control. This remote server then acts as a gateway, allowing you to connect to your Linux server securely.
The benefits of remote SSH access are numerous. It provides a secure method to manage devices located in remote areas, allowing for efficient maintenance and control. It simplifies device monitoring and troubleshooting, significantly reducing the need for on-site visits. Furthermore, it enables you to run commands and batch jobs remotely, allowing you to update software, manage configurations, and perform diagnostics.
Security is paramount. When configuring SSH, ensure you employ robust security practices. Change the default SSH port to something other than 22 to deter automated attacks. Use strong passwords or, preferably, implement key-based authentication. Regularly update the SSH server software to patch security vulnerabilities. Furthermore, understand that firewalls are crucial for securing your devices. Configure the firewall to allow only necessary traffic, restricting access to the SSH port to trusted IP addresses only. Consider implementing two-factor authentication to provide an additional layer of protection.
Several techniques can enhance remote access to IoT devices. Setting up a headless Raspberry Pi involves installing the operating system, enabling SSH, and configuring Wi-Fi. Using tools like `ifconfig` in the terminal enables you to identify the assigned IP address. With a wired network connection established, you can then access the Raspberry Pi and send commands from a web portal. Furthermore, the use of solutions like SocketXP offers a cloud-based approach to device management, simplifying remote access for developers and hobbyists.
Consider the scenario of controlling a Raspberry Pi remotely using an Android device. You would first set up SSH access on the Raspberry Pi, ensuring you know its local IP address. Then, install an SSH client on your Android device. By inputting the Raspberry Pi's IP address, the configured port, username, and password, you can then connect and execute commands. For enhanced control, you can employ VNC or RDP clients, granting you a graphical interface of the Raspberry Pi's desktop.
The core technologies for remote access include SSH, VNC, and RDP. SSH offers a secure command-line interface, suitable for executing commands, transferring files, and managing the device's configuration. VNC provides a graphical interface, allowing you to view and control the device's desktop environment. RDP is another protocol offering similar graphical access, commonly used in Windows environments. Each method provides unique capabilities suited to various needs. The selection of the best method depends on the specific requirements of the device and user preferences.
In conclusion, securing and enabling remote access to IoT devices, especially those behind firewalls and NAT routers, is essential for efficient management and monitoring. By leveraging the capabilities of SSH and employing innovative solutions like SocketXP, you can bypass the limitations of network configurations. This provides you with secure, seamless, and effective control over your IoT devices, regardless of their location. Prioritizing security measures, utilizing best practices, and staying informed about evolving technologies will allow you to harness the full potential of your IoT devices, driving innovation and enhancing connectivity. Remember, the key is to embrace the tools and techniques that best suit your needs, allowing you to seamlessly access and manage your devices from anywhere.


 devices? Gaining secure and seaml)